Surviving Stupidity

Ball valve for draining boil kettleI drooled over friends’ kettles with integrated ball valves. It looked so convenient! All you have to do is open a valve and hot water flows into your mash tun or wort flows right out into your fermenter.

I have a confession to make: I have done something stupid while brewing. Repeatedly. I’m not even talking about losing track of time and missing a hop addition or forgetting ingredients, I’m talking about nearly losing the ability to use my left hand. Every time I brewed. Literally, my guardian angel must really like me.
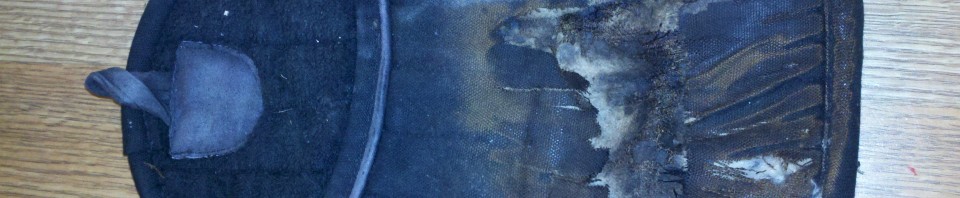
Please view: Exhibit AScorched Potholder – the burned-up hand protector. This is a heavy duty pot-holder, which sane people use to remove hot items from the oven or stove top. You probably noticed several layers of fabric are missing and the top layers which are present are charred to a crisp.

Looking at this picture in hindsight, I am almost embarrassed by my own stupidity. For over a year, while using my converted keg brew kettle, the way I transferred hot liquid into my mash tun was to place it on a rack on the ground next to my burner, grab the handle integrated into the keg with my right hand, use the above potholder to grasp the still red-hot bottom of the kettle and tip the kettle into the cooler. The 165-degree F water splashed vigorously out of the kettle, through the air, into the cooler and some of it splashed out, but never enough to soak through the pants I was wearing.

Eventually, I realized what a horrific trip-to-the-emergency-room-in-waiting this process is and decided to do something about it. I purchased a weldless kettle conversion kit and a stainless dip tube. My first few brews went so smoothly, I almost felt lazy. It was so nice not to have to worry if my fingers would slip off the pot-holder and get burned. I didn’t have to worry whether the liquid would splash out and burn me while dumping from one container to another.

Don’t do dumb stuff, like I did. It’s worth the money to set your kettle up correctly and be safe.

If you have any stories about dumb brewing stuff you or “someone you know” have done, share them below.

Misadventures in Yeast Washing

Jars of Yeast
The jar on the left was properly washed, leaving the trub behind. The three on the right have a layer of trub below the layer of clean yeast.

If you’ve been homebrewing for a while, or even if you’re just starting, you’ve probably heard reusing your yeast can be a good thing. In most cases, the yeast is not in ideal condition when you buy it at the homebrew shop.

Depending on where you are, your yeast packet or vial may have been shipped from the opposite coast, half-way across the country or from another continent. It take three or four uses for the yeast to really hit its stride.

I’m still learning the best techniques for yeast washing, but on a recent bottling day, I learned an important lesson: when you’re tired, you’ll probably mess something up. As you can see from the photo, I was not careful to leave all the trub in the settling vessel.

It was late, I was tired and I just wanted to go to bed. I poured the slurry and let it settle, then poured it into the final jars. I made sure to leave an inch or two of sludge in the middle step, but there was so much trub in the jar I will have to wash the yeast again before I can use it. As you can see, the next day, I properly washed the yeast from the biere de garde I brewed and the jar contains only nice, clean yeast.

Anyone else miss an important step in your process? Ever have something like this happen, which you know you should have caught but missed it and were completely shocked the next day? Tell me your story.

Keep trying to make super beer! That’s what the hobby is about.

Back to Back Brew Days

23 gallons of wort!When your beer supply starts to get low, you have to take drastic measures. Over the course of the weekend, I brewed a robust porter and a biere de garde. The result: two fermenters happily bubbling away as 23 gallons of wort becomes beer!

Brewing on back to back days allows certain things to happen and my second brew day ran much more smoothly. My mash tun was already out in the garage, my burner and propane were all set up and ready to go, all the gear I usually have to lug from the basement to the garage skirt was already in my brewing area.

All I had to do was get my grain weighed and crushed, carry my water out and fire up the burner. Having all that stuff set up didn’t really shorten my second brew day much. Rather than carrying stuff up to my brewing area, I had to clean and store my gear. The end result being not much time savings on day two. However, the combined time for the two brew days was much lower than the time for two brew days separated by weeks, when I would have to duplicate the setup time and the cleanup time for two distinct brew days.

So, what are the benefits of back to back brew days besides some minor time savings? I think the main benefit is knowledge. When brewing on a day all by itself, I worry about remembering everything to try to make the day as efficient as possible. The second day, I was really able to think about my process.

I just added a weldless ball valve to my kettle, which is awesome. I am so lucky I hadn’t burned myself. However, my water temp going into the mash tun was much lower because it took a few minutes to run the liquid through a half-inch  tube rather than just dumping the kettle into the tun.

My second brew day I realized I could just raise the temp of my strike water, transfer to the mash tun and wait for the water temp to drop to my targeted temp. It’s something obvious, but when I’m in the heat of set up and trying to stay focused, I don’t always think of obvious solutions.

When you can, I think scheduling back-to-back brew days would be great to learn more about your brewing process. In the comments, let me know what you’ve learned from doing brews close together.