The Liquid Side
Most beer lovers, and especially homebrewers, dream about having a dedicated kegerator set up to serve beer from kegs. There are lots of benefits to serving from kegs: convenience (most homebrewers can fill one keg rather than 52 bottles) . . . and it’s pretty badass to pour your beer from a tap.

In this article, I’m going to walk through the components you’ll need to set up the liquid side of a draft (draught) system. This is a list of the components, and I’ll flag specific components that may come as different types or sizes so you can use this list for any system. The links to components I personally like are affiliate links, but you can find a wide range of options, prices, and sellers for similar items.
I am not going to discuss kegerators vs converted chest freezers vs refrigerators. This is just about the parts you need to get beer (or other liquids) from the keg to the faucet where it can fill your glass.
What You See
When you set up a draught system, the liquid side has the components you usually see. Most people only notice the tap handle and faucet you use to actually pour the beer, but you also see the front part of the shank. Let’s see what’s in store:

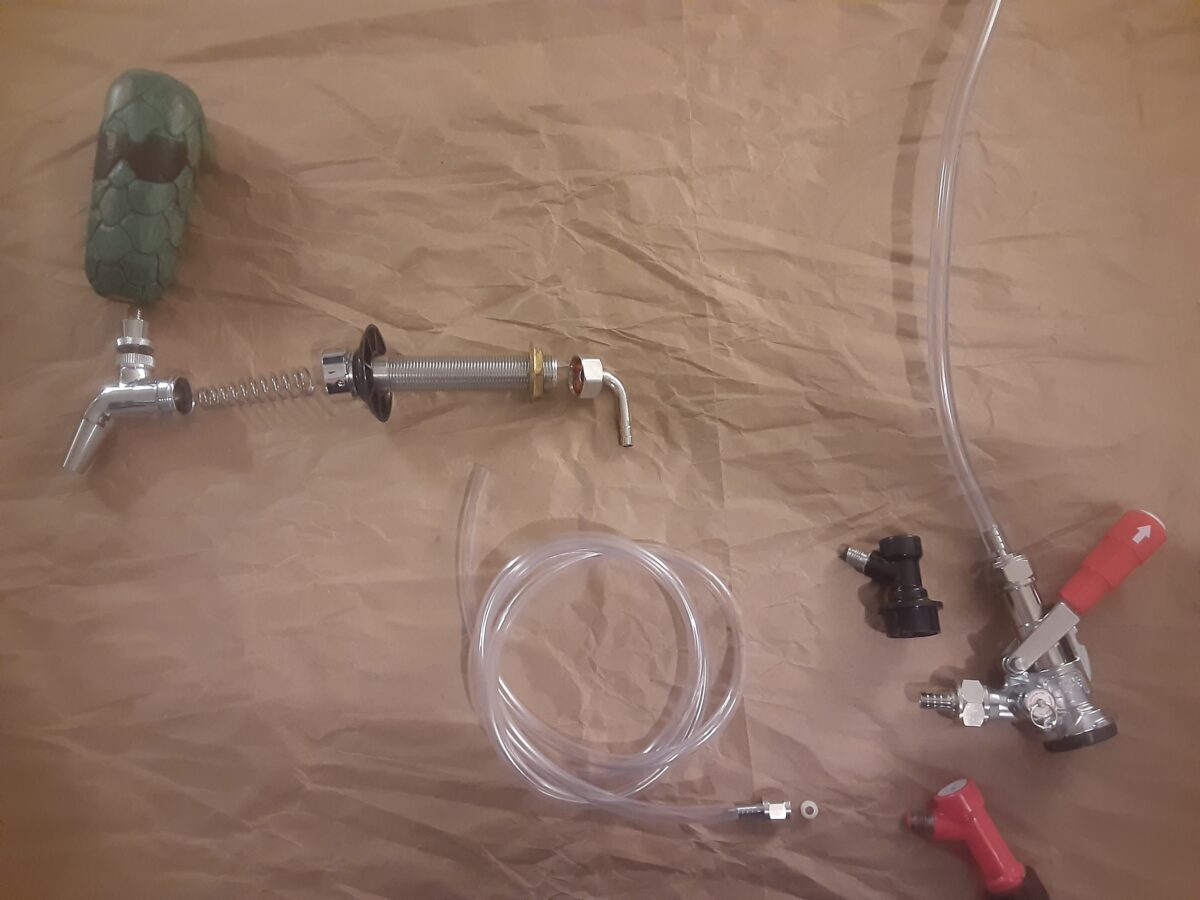
- Faucet (affiliate link)– This is the component the beer pours from. There is a mechanism attached to the 3/8”-16 UNC bolt that opens and closes the faucet. The specific faucet in these photos is an Intertap faucet sent to me as a sample. These are unique on the market because you can change out the spout from the regular pour spout(pictured) to a growler-filler spout you can slide a piece of vinyl tubing onto to fill bottles and growlers. There is also a nitro spout option, which allows you to pour beers with nitrogen; the main difference is there are small holes in the spout to help knock the nitrogen out of solution so you get the smooth cascading bubbles associated with nitro beers. I purchased the spring pictured to allow the tap to close automatically when I release the tap handle rather than needing to push the handle back. This also minimizes the chances of accidentally leaving the tap open and losing beer because it isn’t closed completely.
- Tap Handle – This is a handle that is attached to the faucet. You pull on the handle and beer comes out of the faucet. When you are in a bar, these are what you probably remember about the system. Most commercial beers have a unique tap handle for each beer as a way to be recognizable. But you can also purchase simple handles that just provide something to pull on.
- Ferrule – This is optional, and its need is determined by the tap handle you are using. Some handles have a 5/16” bolt sticking out of the bottom rather than a 3/8”-16 UNC (USA) nut embedded in the body of the handle. Since the faucets have a threaded bolt on top, the handle threads into the top of the ferrule, which then threads onto the bolt on the faucet.
- Shank – Beer shanks are units that thread onto the faucet and pass through whatever type of wall you are mounting your taps on. For kegerators with pipes coming out the top, the shank is very short because the wall of the pipe is narrow. If you built a collar for a converted chest freezer or the door/wall of a refrigerator, the shank needs to be long enough to pass through the barrier. Passing through the wall of a walk-in cooler is common for bars and restaurants and requires the longest shanks in general.
The Hidden Pieces
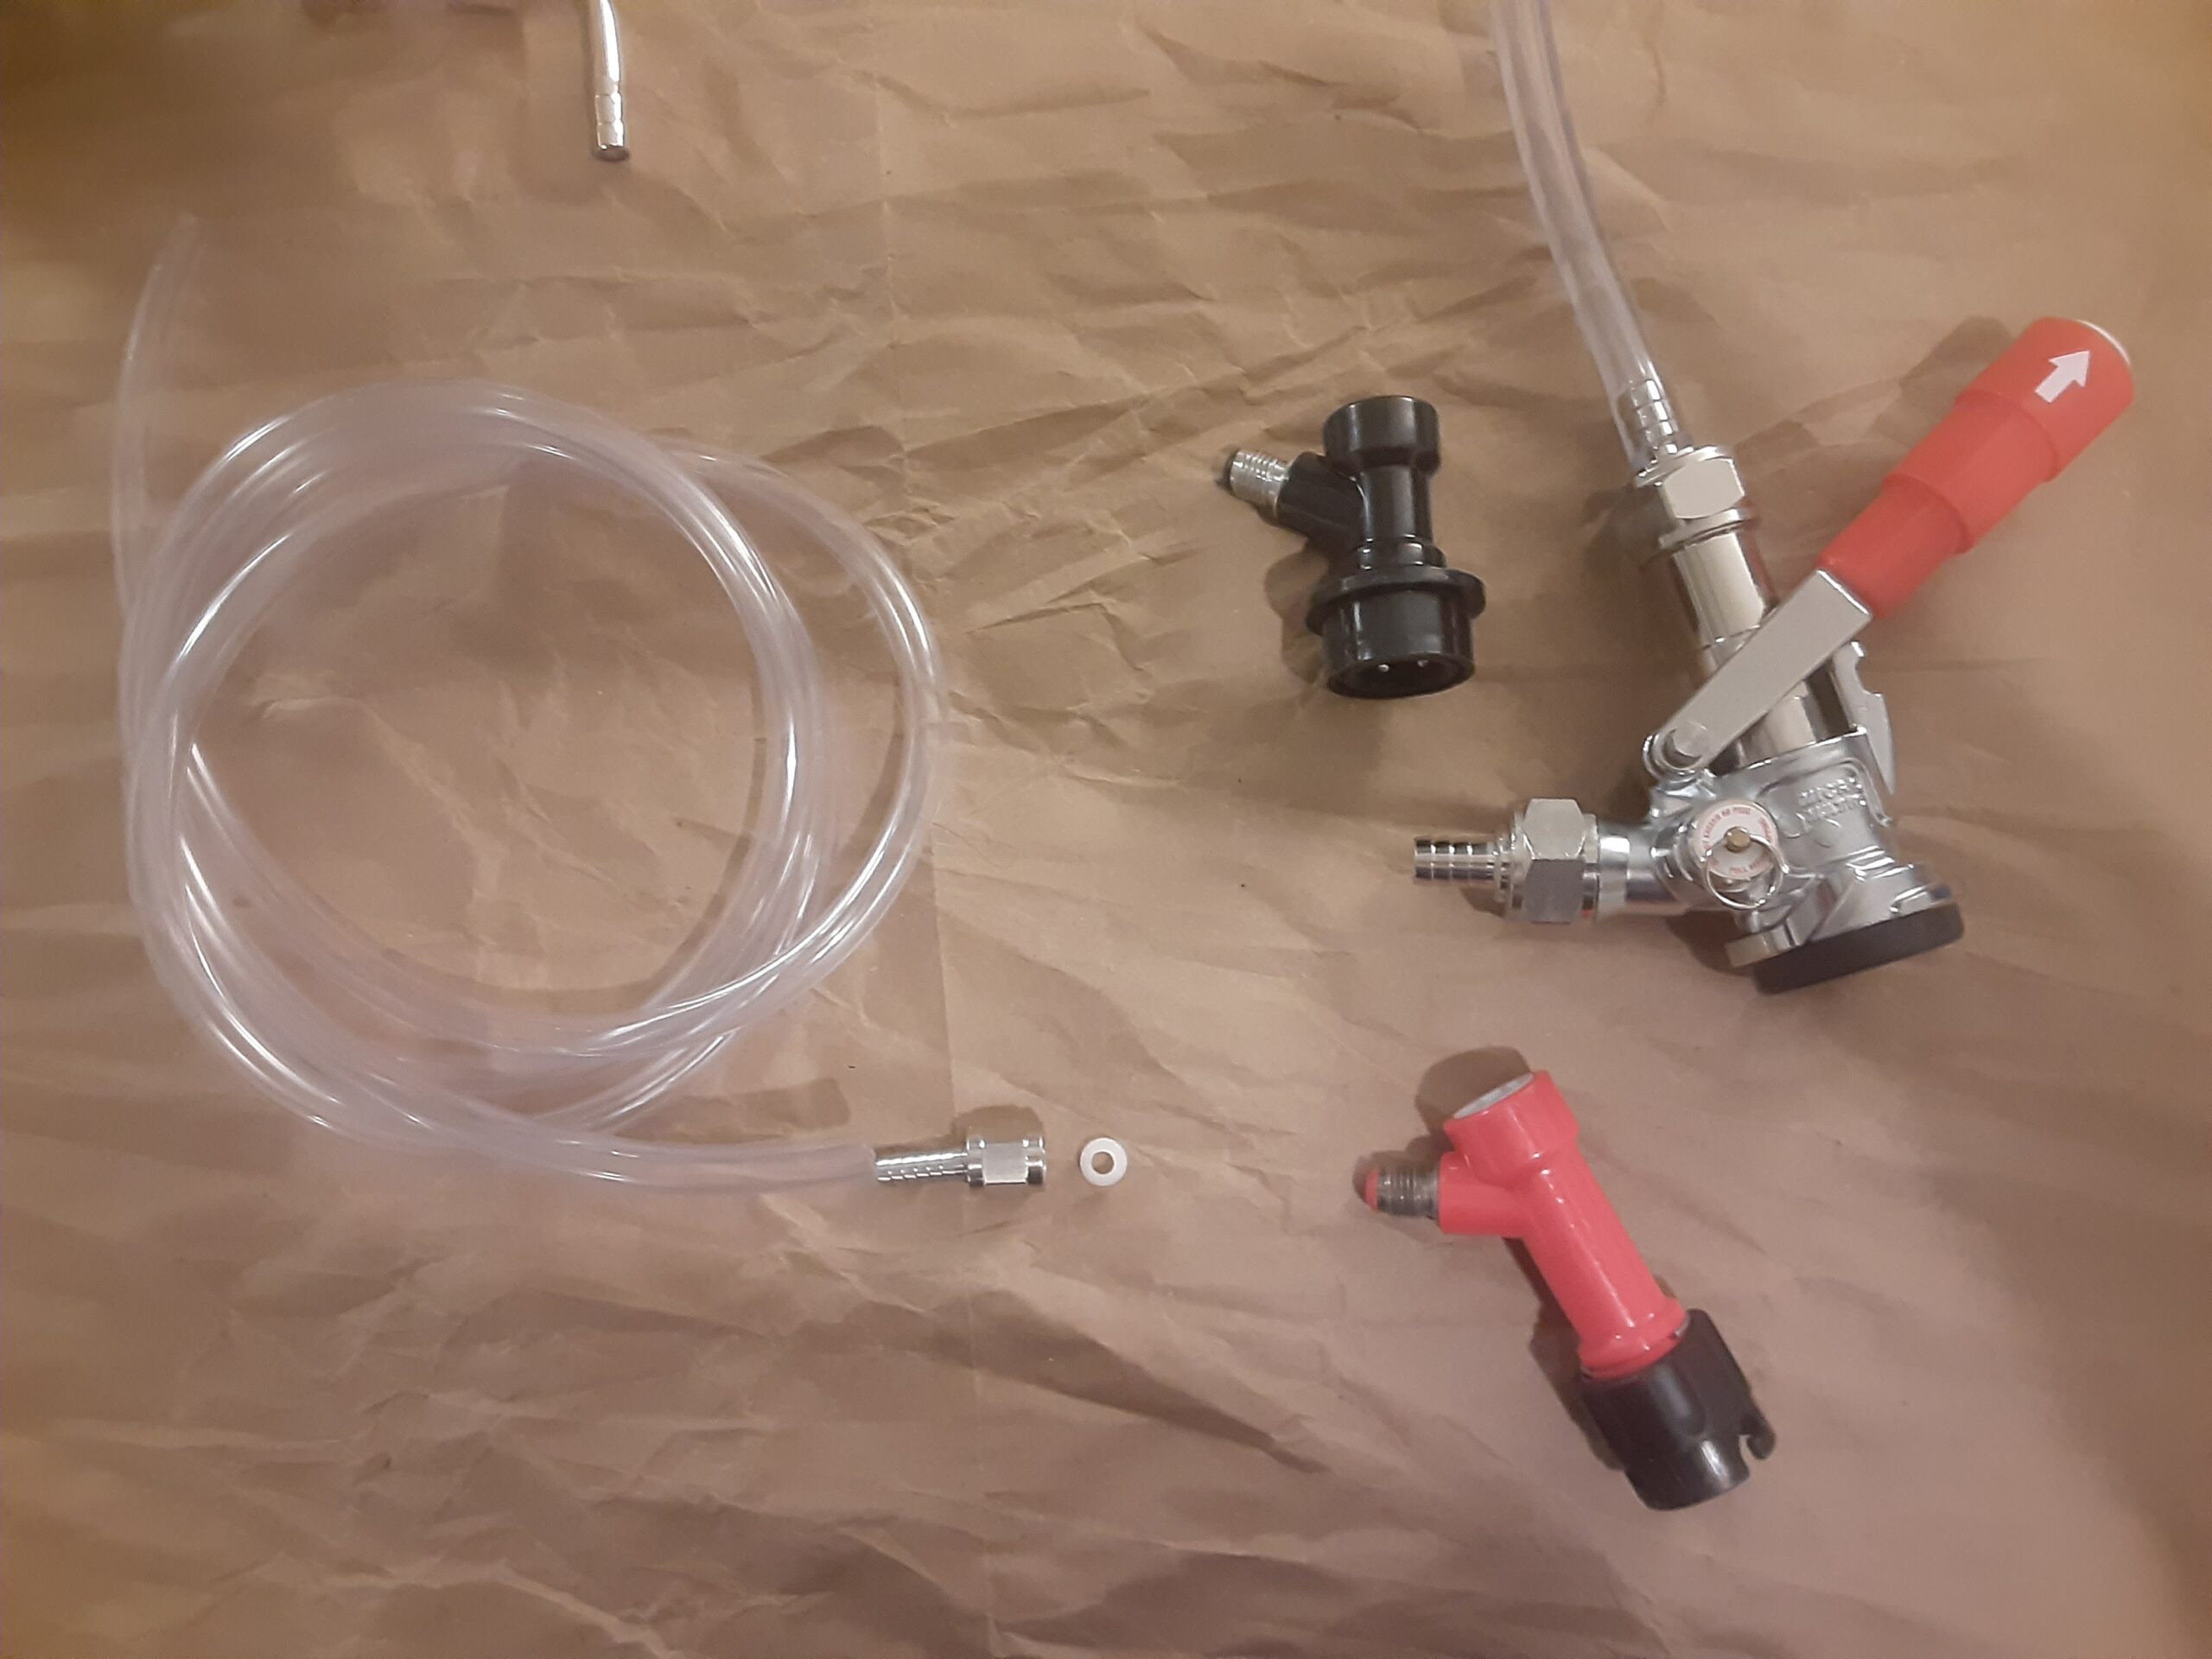
- Tailpiece – The tailpiece is what connects the shank to your beverage tubing. Three components make up this part of the system. There is a tailpiece gasket made of a soft material to make a good seal, usually neoprene or silicone. A beer hex nut secures the tailpiece to the threaded body of the shank. The tailpiece itself fits inside the beer hex nut and presses against the gasket to provide a liquid-tight seal.
- Beverage Tubing – There are lots of varieties of beverage tubing, but this allows the beer to flow from the keg to the tap. Tubing is flexible to allow you to move kegs around to keep things organized as well as to be able to manipulate the quick disconnects when you need to detach the keg.
- Quick Disconnect (QD) – QDs are fittings that lock onto the keg to allow the liquid to flow out of the keg into your draught system. In general, homebrewers use either ball lock or pin lock kegs and commercial breweries use sanke couplers on their kegs. This isn’t always true, but fits the majority of cases. Differences outlined below.
- Sanke – These are favored by commercial bars and breweries for many reasons. One of the main benefits is that the sanke coupler both provides the CO2 gas hookup to push the beer and the attachment for the beer to flow out of the keg into the tubing to be delivered to the tap. With some practice, a sanke QD can be attached or detached with one hand/one motion.
- Ball Lock – Ball lock kegs became popular with homebrewers when Pepsi stopped using them to deliver fully mixed and carbonated soda to commercial accounts. The quick disconnect part of these function similar to the quick disconnects used on air compressors where you lift a collar, allowing small metal balls to slide over a ridge and into a groove, then the collar is pushed back down, using the balls to lock the QD in place in the groove. When Pepsi switched to the boxes of syrup that get mixed with carbonated water at the point of service, thousands of these kegs became available for homebrewers to use for carbonating and serving their beers. Ball locks became the standard in many ways and some companies are now making ball lock kegs specifically for homebrewers.
- Pin Lock – Pin lock kegs were used by Coca Cola to deliver fully mixed and carbonated soda to their client accounts. To make their system incompatible with Pepsi’s ball lock kegs, these QDs have notches cut into them that slide over pins on the post of the keg to lock in place.
- Keg – This is where the liquid goodness lives until you are ready to pour it into a glass and it enters the maze outlined above. Keg types correlate to the QDs outlined above: sanke, ball lock, or pin lock.
The Plan
You will want to put some thought into the type of system you build. Whether you will be building a system to accommodate sanke, ball lock, or pin lock kegs. Most people pick one type and stick with it. If you are setting up a commercial bar or just want to keep commercial beers on tap, you will probably be going exclusively with sanke QDs, because that is what virtually all breweries use.
Homebrewers have more options. Many homebrewers I talk with pick either ball lock or pin lock kegs and stick with that type of keg no matter what. I own both ball lock and pin lock kegs, so I set up all my lines with ¼” MFL nuts and purchase MFL threaded quick disconnects so I can swap them out as needed for pin lock, ball lock, or sanke kegs.
Whatever you decide, you’ll be able to put together a great home draught system. If you have specific questions, please send me a message and I’ll either get the answer, whether it’s something I know or need to do a little research.
#BrewUpAnAdventure
Component List with Affiliate Links
Intertap Forward-Sealing Faucet – https://www.homebrewing.org/Intertap-Stainless-Steel-Forward-Sealing-Faucet_p_7049.html?AffId=337
Intertap Self-Closing Spring – https://www.homebrewing.org/Self-Closing-Faucet-Spring-for-Intertap-Faucet_p_7058.html?AffId=337
Shank – https://www.homebrewing.org/4-in-Stainless-Steel-Intertap-Faucet-Shank-_p_7057.html?AffId=337
Tailpiece – https://www.homebrewing.org/Bent-Brass-Tailpiece-316-ID_p_4024.html?AffId=337
3/16″ Beer Tubing – https://www.homebrewing.org/316ID-x-716OD-Thickwall-PVC-Beer-Line–Per-Foot_p_820.html?AffId=337
Ball Lock Quick Disconnects – https://www.homebrewing.org/Kegerator-Homebrew-Conversion-Kit_p_720.html?AffId=337
Pin Lock Quick Disconnects – https://www.homebrewing.org/Pin-Lock-Kegerator-Homebrew-Conversion-Kit_p_4080.html?AffId=337
Stainless Steel Sanke Coupler –https://www.homebrewing.org/D-System-Coupler-Stainless-Steel-Sanke_p_3573.html?AffId=337
Amazon Affiliate Links
Intertap Forward-Sealing Faucet – https://amzn.to/3hdHf9L
Intertap Self-Closing Spring – https://amzn.to/3nAs3FI
Shank – https://amzn.to/2J46bUr
Tailpiece – https://amzn.to/2WvkFj6
3/16″ Beer Tubing – https://amzn.to/34tREsv
Ball Lock Quick Disconnects – https://amzn.to/3nxJkzA
Pin Lock Quick Disconnects – https://amzn.to/37sU8cD
Stainless Steel Sanke Coupler – https://amzn.to/3aixB46
