Be Careful While Brewing

Warning! The images below show graphic injuries. I selected the least objectionable photo as the preview image and as the first example of the need to be careful when we homebrew.

Homebrewing is a hobby, and this caused me to be less careful than I would be in a commercial brewery. I am lucky that the worst injury I received was throwing out my back because I lifted a full mash tun incorrectly. Not a graphic injury, but I don’t think I’ve ever had pain that intense before in my life.

I get kind of upset when I hear fellow homebrewers talking about getting so drunk during their brew days they miss whole portions of their process. I mean, everyone makes their own choices, but the odds of receiving an injury like those below are increased if you are having trouble maintaining your balance because you’re inebriated.

OK, you had your chance to navigate away from this page. Continue at your own risk. The photos below are not mine, and were posted to a Facebook group back in 2017. I did contact each person to request permission to use these photos, and I received permission for each of the photos used below.

Be safe!

Glass Breaks!

It may seem obvious, but glass does break. I had two friends have glass carboys break on them in separate incidents within a surprisingly short period of time. Glass carboys are strong, but the fact they are brittle also presents problems when they receive the wrong impact.

One friend was placing a carboy on a high shelf. When he placed it on the shelf and allowed it to swing back, it hit the carboy next to it, broke in half and the top portion slid down and almost landed on him. Luckily, he was not injured.

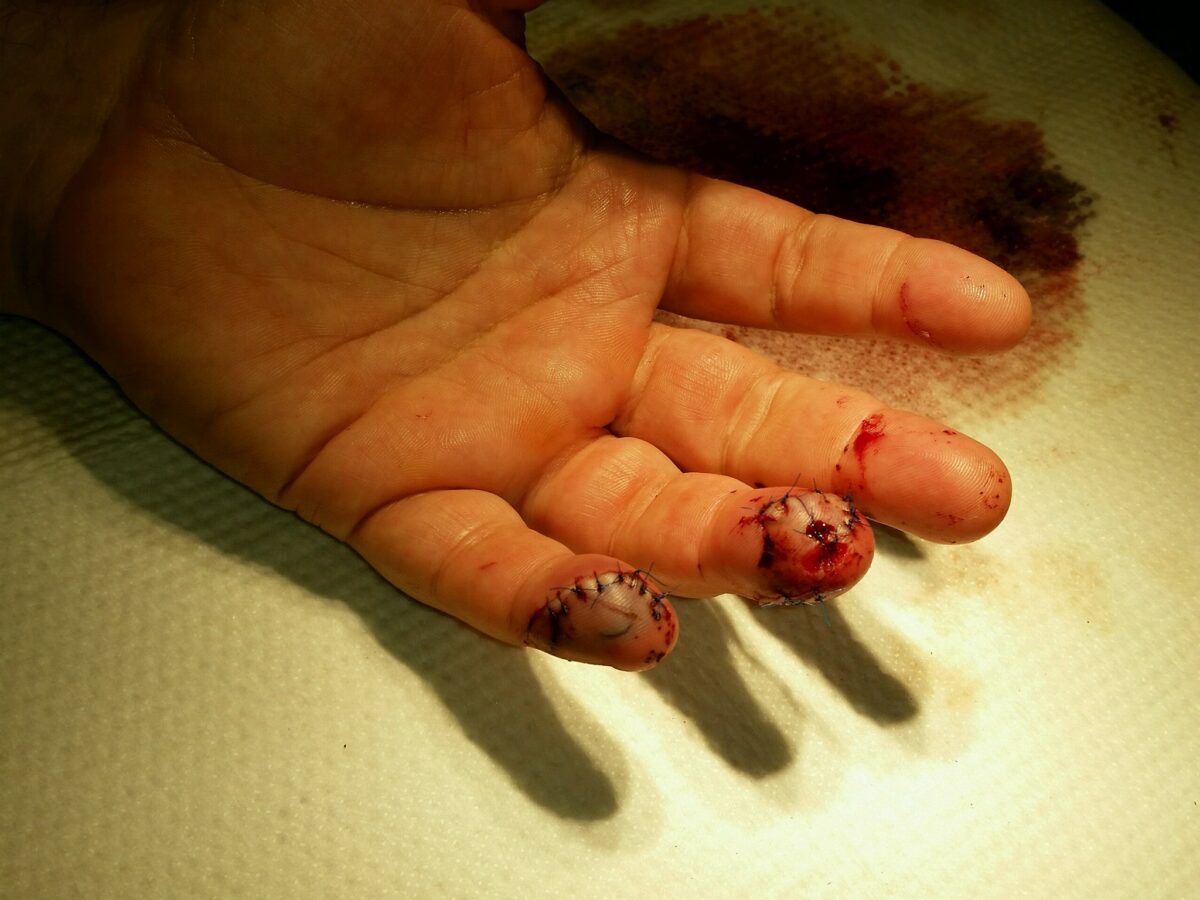
Another friend had a full carboy break when he was setting it down on a concrete floor. It split about halfway between the top and bottom, slide over and cut open his palm, forcing him to the emergency room for stitches across his palm. The injury pictured below was a similar situation, but cut the fingers rather than the palm.

Kettles Get Hot!

I don’t know the percentages, but many homebrewers use propane burners to bring their wort to a boil. As a result, the sides of kettles get very hot! If you are using a converted keg, there is also a ridge of metal that gets even hotter than the side of the kettle that has liquid on the other side.

If you don’t pay attention to where you are, it is easy to accidentally back up against your kettle and burn the back of your leg, as shown by this photo.

Chemicals are Chemical-y

I did not get a picture of this, but a friend accidentally spilled undiluted Star-San on his arm. This is a concentrated acid used to sanitize equipment and eliminate bacteria that could negatively affect the flavor of the beer we’re trying to make.

My friend was able to rinse away the concentrate within 10 seconds. In that time, though, it had already peeled away his top layer of skin, leaving a patch of skin that felt “like road rash”.

We’re Moving Boiling Water

The greatest danger is probably the amount of hot water we move around between different vessels. These pictures are the most disturbing to me, and are great examples of what can happen when we make mistakes.

Burns, and especially scalding injuries are extremely painful and also have a high potential for permanent damage.

If you have children, these are also some of the injuries that could be most like to be inflicted on a curious child who just wants to see what you are doing. Try to limit access to your brewing space to those who are capable of understanding the dangers and risks.

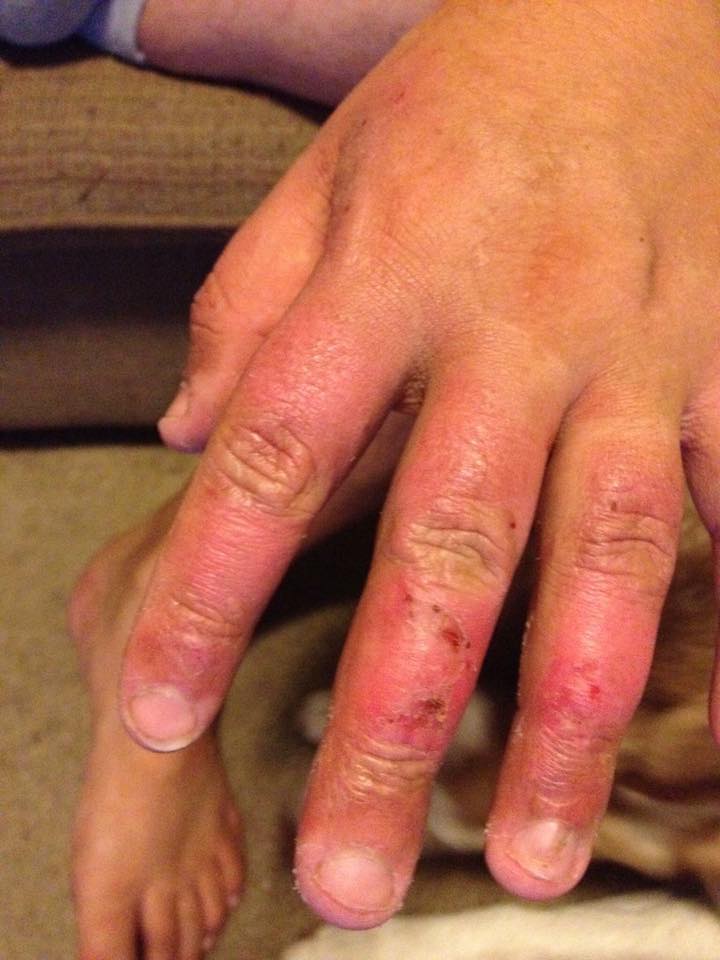
This injury was probably caused by an open ball valve or accidentally dropping his hand into a boiling kettle. Regardless, you can see the middle and ring fingers showing damage beyond the top layer of skin.

When you are brewing, make sure the valves are closed on any vessel you are transferring into. I’ve had things happen where my kettle’s ball valve was open when I was filling it, but happily, no one was on that side of the kettle.

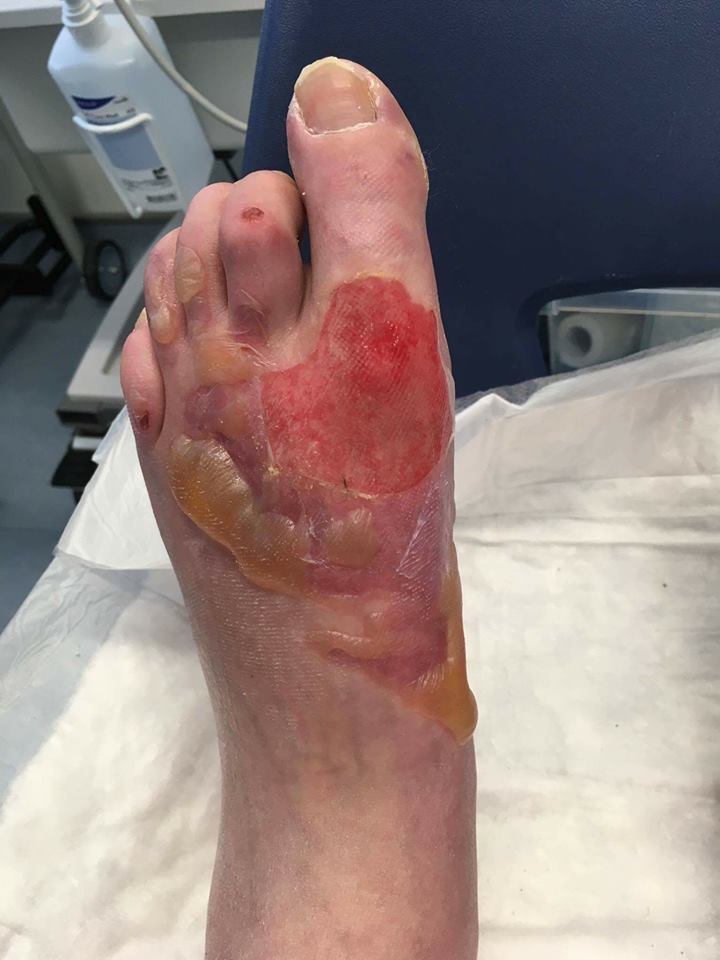
I believe these next two photos were from the same individual. I don’t remember if this was a case where kettle tipped over of there was an open ball valve. But regardless, the person was wearing mesh-topped athletic shoes.

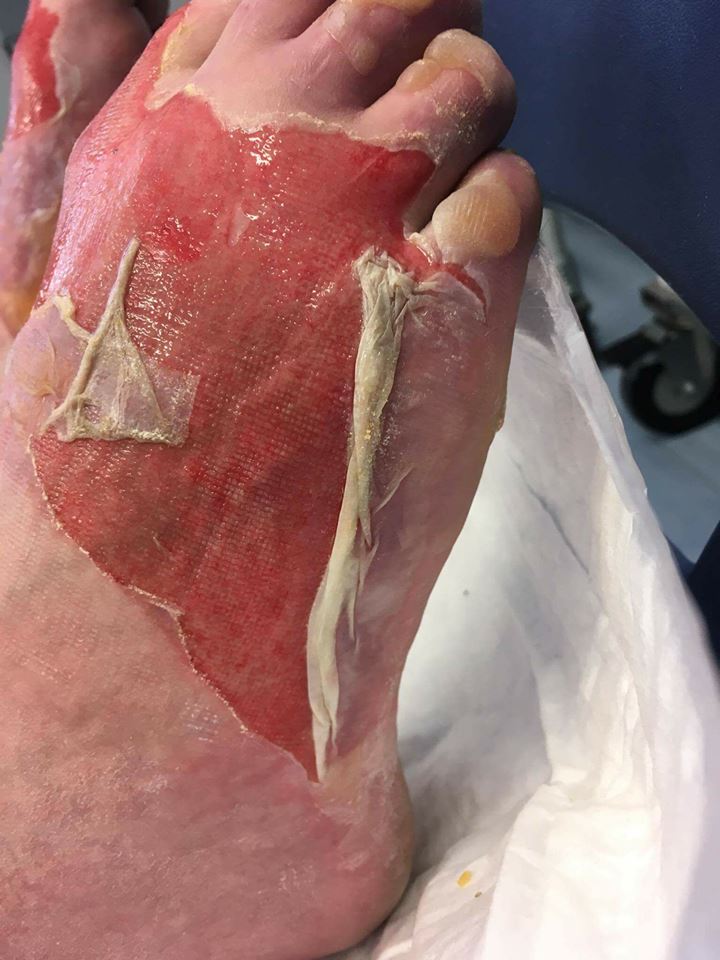
Not only did this result in the hot liquid immediately passing into the shoe and burning his feet, but his socks and the shoe actually held the boiling liquid against his skin to do more damage.

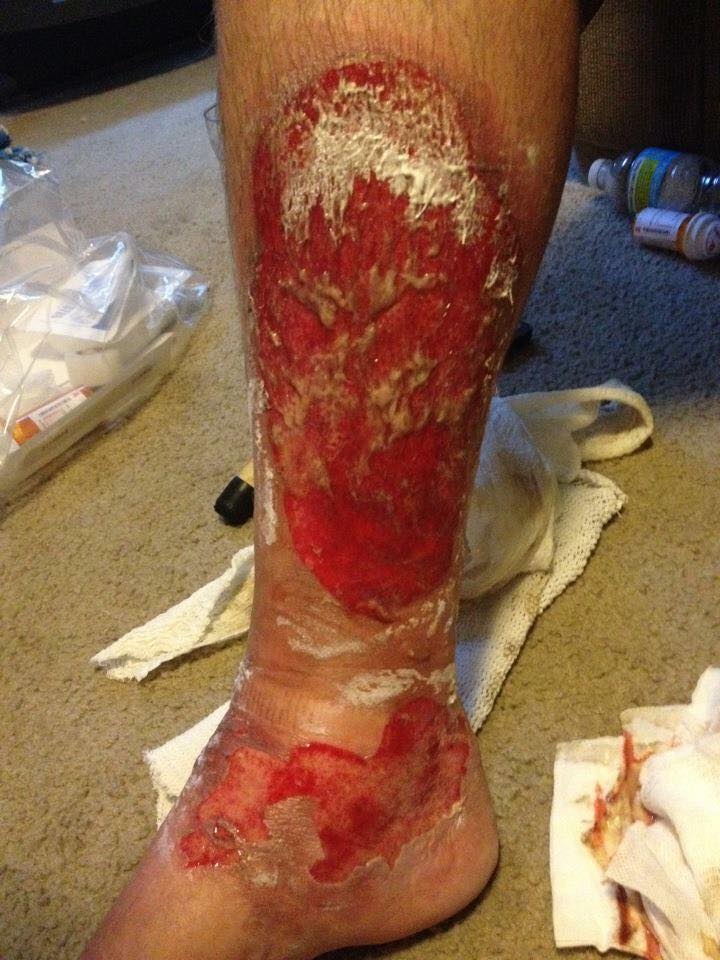
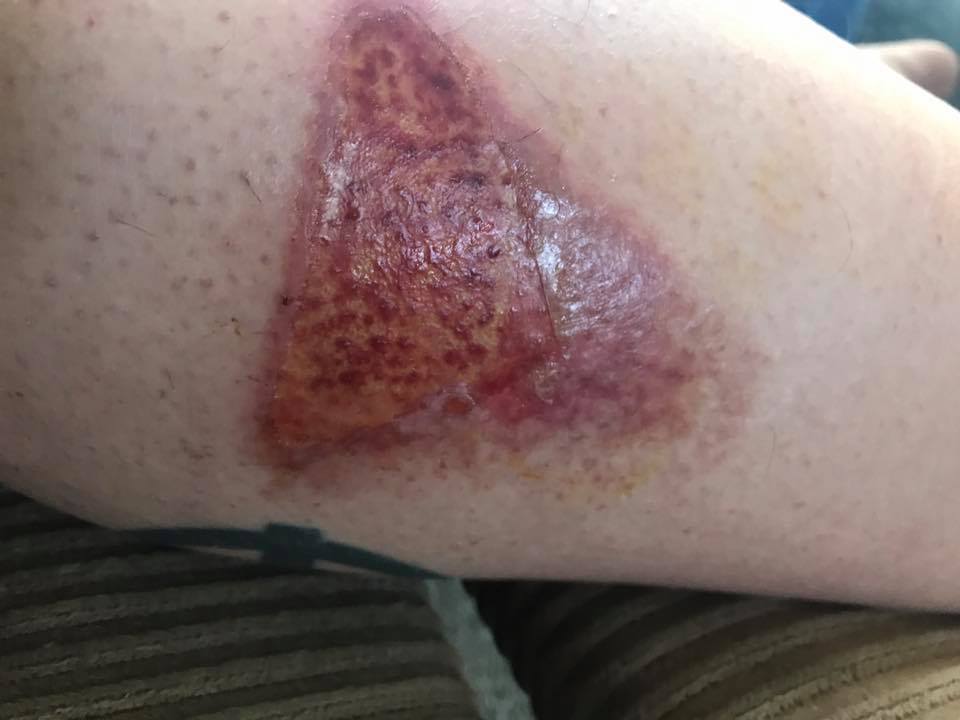
This next injury was from a kettle falling and spilling the contents onto this person’s leg. The picture shows what it looked like after enough time had passed he needed to change the bandage, and it is still disturbing.

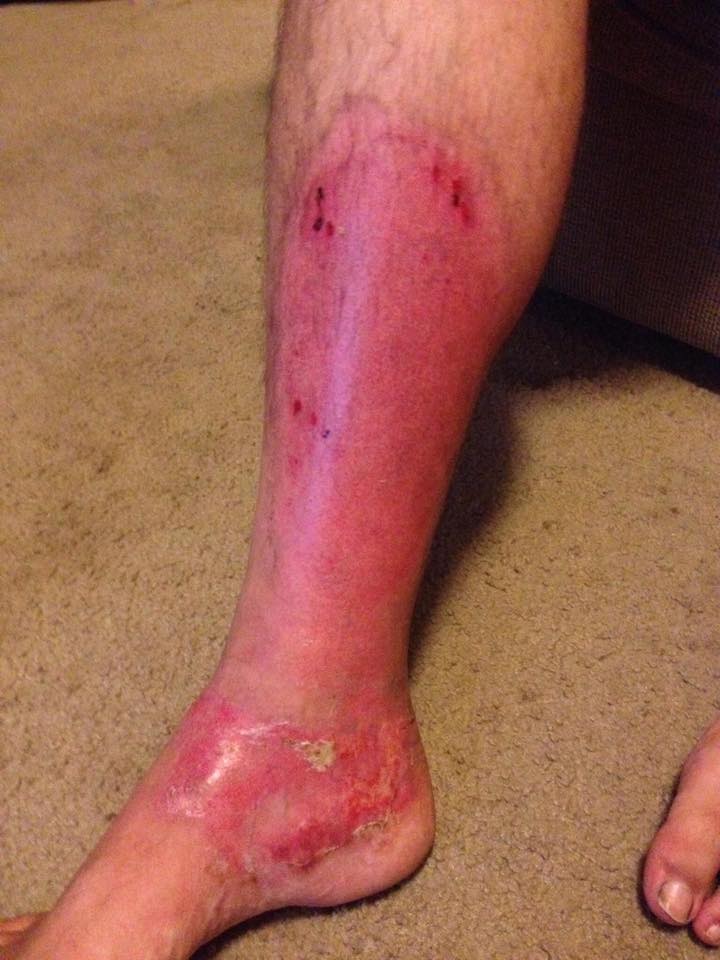
The injured person was kind enough to send a follow-up photo of what the injury looked like after 18 days of healing. It still looks pretty gnarly, but amazingly well-healed.

Be careful on your brewdays!

Pay attention and stay alert, because you can still make mistakes. Hobbies are meant to be enjoyed, and homebrewing is no different. Take care of yourselves!

Building a Draft Beer System Part 2

The Liquid Side

Most beer lovers, and especially homebrewers, dream about having a dedicated kegerator set up to serve beer from kegs. There are lots of benefits to serving from kegs: convenience (most homebrewers can fill one keg rather than 52 bottles) . . . and it’s pretty badass to pour your beer from a tap.

In this article, I’m going to walk through the components you’ll need to set up the liquid side of a draft (draught) system. This is a list of the components, and I’ll flag specific components that may come as different types or sizes so you can use this list for any system. The links to components I personally like are affiliate links, but you can find a wide range of options, prices, and sellers for similar items.

I am not going to discuss kegerators vs converted chest freezers vs refrigerators. This is just about the parts you need to get beer (or other liquids) from the keg to the faucet where it can fill your glass.

What You See

When you set up a draught system, the liquid side has the components you usually see. Most people only notice the tap handle and faucet you use to actually pour the beer, but you also see the front part of the shank. Let’s see what’s in store:

  1. Faucet (affiliate link)– This is the component the beer pours from. There is a mechanism attached to the 3/8”-16 UNC bolt that opens and closes the faucet. The specific faucet in these photos is an Intertap faucet sent to me as a sample. These are unique on the market because you can change out the spout from the regular pour spout(pictured) to a growler-filler spout you can slide a piece of vinyl tubing onto to fill bottles and growlers. There is also a nitro spout option, which allows you to pour beers with nitrogen; the main difference is there are small holes in the spout to help knock the nitrogen out of solution so you get the smooth cascading bubbles associated with nitro beers. I purchased the spring pictured to allow the tap to close automatically when I release the tap handle rather than needing to push the handle back. This also minimizes the chances of accidentally leaving the tap open and losing beer because it isn’t closed completely.
  2. Tap Handle – This is a handle that is attached to the faucet. You pull on the handle and beer comes out of the faucet. When you are in a bar, these are what you probably remember about the system. Most commercial beers have a unique tap handle for each beer as a way to be recognizable. But you can also purchase simple handles that just provide something to pull on.
  3. Ferrule – This is optional, and its need is determined by the tap handle you are using. Some handles have a 5/16” bolt sticking out of the bottom rather than a 3/8”-16 UNC (USA) nut embedded in the body of the handle. Since the faucets have a threaded bolt on top, the handle threads into the top of the ferrule, which then threads onto the bolt on the faucet.
  4. Shank – Beer shanks are units that thread onto the faucet and pass through whatever type of wall you are mounting your taps on. For kegerators with pipes coming out the top, the shank is very short because the wall of the pipe is narrow. If you built a collar for a converted chest freezer or the door/wall of a refrigerator, the shank needs to be long enough to pass through the barrier. Passing through the wall of a walk-in cooler is common for bars and restaurants and requires the longest shanks in general.

The Hidden Pieces

  1. Tailpiece – The tailpiece is what connects the shank to your beverage tubing. Three components make up this part of the system. There is a tailpiece gasket made of a soft material to make a good seal, usually neoprene or silicone. A beer hex nut secures the tailpiece to the threaded body of the shank. The tailpiece itself fits inside the beer hex nut and presses against the gasket to provide a liquid-tight seal.
  2. Beverage Tubing – There are lots of varieties of beverage tubing, but this allows the beer to flow from the keg to the tap. Tubing is flexible to allow you to move kegs around to keep things organized as well as to be able to manipulate the quick disconnects when you need to detach the keg.
  3. Quick Disconnect (QD) – QDs are fittings that lock onto the keg to allow the liquid to flow out of the keg into your draught system. In general, homebrewers use either ball lock or pin lock kegs and commercial breweries use sanke couplers on their kegs. This isn’t always true, but fits the majority of cases. Differences outlined below.
    • Sanke – These are favored by commercial bars and breweries for many reasons. One of the main benefits is that the sanke coupler both provides the CO2 gas hookup to push the beer and the attachment for the beer to flow out of the keg into the tubing to be delivered to the tap. With some practice, a sanke QD can be attached or detached with one hand/one motion.
    • Ball Lock – Ball lock kegs became popular with homebrewers when Pepsi stopped using them to deliver fully mixed and carbonated soda to commercial accounts. The quick disconnect part of these function similar to the quick disconnects used on air compressors where you lift a collar, allowing small metal balls to slide over a ridge and into a groove, then the collar is pushed back down, using the balls to lock the QD in place in the groove. When Pepsi switched to the boxes of syrup that get mixed with carbonated water at the point of service, thousands of these kegs became available for homebrewers to use for carbonating and serving their beers. Ball locks became the standard in many ways and some companies are now making ball lock kegs specifically for homebrewers.
    • Pin Lock – Pin lock kegs were used by Coca Cola to deliver fully mixed and carbonated soda to their client accounts. To make their system incompatible with Pepsi’s ball lock kegs, these QDs have notches cut into them that slide over pins on the post of the keg to lock in place.
  4. Keg – This is where the liquid goodness lives until you are ready to pour it into a glass and it enters the maze outlined above. Keg types correlate to the QDs outlined above: sanke, ball lock, or pin lock.

The Plan

You will want to put some thought into the type of system you build. Whether you will be building a system to accommodate sanke, ball lock, or pin lock kegs. Most people pick one type and stick with it. If you are setting up a commercial bar or just want to keep commercial beers on tap, you will probably be going exclusively with sanke QDs, because that is what virtually all breweries use.

Homebrewers have more options. Many homebrewers I talk with pick either ball lock or pin lock kegs and stick with that type of keg no matter what. I own both ball lock and pin lock kegs, so I set up all my lines with ¼” MFL nuts and purchase MFL threaded quick disconnects so I can swap them out as needed for pin lock, ball lock, or sanke kegs.

Whatever you decide, you’ll be able to put together a great home draught system. If you have specific questions, please send me a message and I’ll either get the answer, whether it’s something I know or need to do a little research.

#BrewUpAnAdventure

Component List with Affiliate Links

Intertap Forward-Sealing Faucet – https://www.homebrewing.org/Intertap-Stainless-Steel-Forward-Sealing-Faucet_p_7049.html?AffId=337
Intertap Self-Closing Spring – https://www.homebrewing.org/Self-Closing-Faucet-Spring-for-Intertap-Faucet_p_7058.html?AffId=337
Shank – https://www.homebrewing.org/4-in-Stainless-Steel-Intertap-Faucet-Shank-_p_7057.html?AffId=337
Tailpiece – https://www.homebrewing.org/Bent-Brass-Tailpiece-316-ID_p_4024.html?AffId=337
3/16″ Beer Tubing – https://www.homebrewing.org/316ID-x-716OD-Thickwall-PVC-Beer-Line–Per-Foot_p_820.html?AffId=337
Ball Lock Quick Disconnects – https://www.homebrewing.org/Kegerator-Homebrew-Conversion-Kit_p_720.html?AffId=337
Pin Lock Quick Disconnects – https://www.homebrewing.org/Pin-Lock-Kegerator-Homebrew-Conversion-Kit_p_4080.html?AffId=337
Stainless Steel Sanke Coupler –https://www.homebrewing.org/D-System-Coupler-Stainless-Steel-Sanke_p_3573.html?AffId=337

Amazon Affiliate Links
Intertap Forward-Sealing Faucet – https://amzn.to/3hdHf9L
Intertap Self-Closing Spring – https://amzn.to/3nAs3FI
Shank – https://amzn.to/2J46bUr
Tailpiece – https://amzn.to/2WvkFj6
3/16″ Beer Tubing – https://amzn.to/34tREsv
Ball Lock Quick Disconnects – https://amzn.to/3nxJkzA
Pin Lock Quick Disconnects – https://amzn.to/37sU8cD
Stainless Steel Sanke Coupler – https://amzn.to/3aixB46

Building a Draft Beer System Part 1

Gas (CO2) Side

The gas side of a draught system is used primarily to push the beer out of the keg with carbon dioxide. CO2 (carbon dioxide) protects the beer from off-flavors created when oxygen interacts with flavor and aroma compounds in the beer. If you’ve ever had beer from a hand-pumped keg, then tried to drink from the same keg the next day, you’ve noticed how the flavor of the beer changes for the worse.

By using a CO2 tank (affiliate link) to provide pressure, you prevent air and oxygen from getting in contact with the beer, preserving the beer’s deliciousness. And also, you don’t have to use a hand pump to pour beer.

Homebrewers Need Extra

If you are just pouring beer, the gas side of your draught system just needs to push the beer out of the keg to your glass. Most people can just have one primary regulator (affiliate link) set to serving pressure, then add a manifold (affiliate link) to split the gas line to as many kegs as you have. If you know you need more than one serving pressure, you can see the notes further down for homebrewers, as your needs are more similar to our needs.

Primary Regulator is in the middle, with a hose leading to a manifold to allow two outputs, one of which is attached to a secondary regulator.

Homebrewers also use their draught system to carbonate their beer in the keg.

The main difference is that if you are serving commercial beers, you can generally serve more than one beer at the same pressure. But to speed the carbonation process, it is nice to have a secondary regulator (affiliate link) you can leave at serving pressure and have the primary regulator set higher to carbonate the keg more quickly.

Hidden from View

Unlike the liquid side, which has the faucet and tap handle readily visible, many people try to keep the gas side of their draft system out of view. If their converted chest freezer or refrigerator is large enough, some people choose to keep their CO2 tank (affiliate link) in their kegerator next to the kegs. Others add a hole to run the gas line from the tank through the wall or door of their kegerator to free up space for more kegs, as I did in the photo below.

Quick Disconnects

The connection between the gas system and your kegs depends on the type of kegs you use. Homebrewers choose between ball lock kegs or pin lock kegs. In the photo below, you can see I use MFL connections on my hoses so I can switch between ball lock and pin lock kegs.

Ball lock kegs and ball lock quick disconnects were used by Pepsi for distributing full kegs of their sodas to restaurants before the current use of concentrates. In a similar way, pin lock kegs and pin lock quick disconnects (affiliate link) were used by Coca Cola. They used different connectors to prevent their customers from switching to their competitors products without needing to replace their whole serving system.

Sanke couplers (affiliate link) are used by commercial breweries, and actually combine both gas and liquid into one connector rather than the two needed for Cornelius-style kegs used primarily by homebrewers.

Tying it All Together

Throughout this article, I’ve shown you all of the separate components that connect to kegs, tanks, and each other. But connecting all of them, you’ll need 5/16″ gas line (affiliate link).

These are the components you’ll need for a CO2 system to set up a kegerator tap system to pour draft beer. If you have questions, please post them below.

#BrewUpAnAdventure